Gnoti

ELK설치 9편 (Cluster구성)

3개의 데이터 전용 노드, 1개의 마스터 전용 노드로 구성합니다.
Master Node가 설치된 서버에는 Kibana, Logstash 을 설치합니다.
데이터는 Master Node 를 통해서만 색인됩니다.

서버스펙

운영 서버에 필요한 CPU, RAM, 저장장치는 총4대
  – OS : Centos 7
  – CPU : 4core
  – RAM : 4GB
  – JAVA : Openjdk 8

Cluster 설치

es-master는 마스터
es-client1는 데이터, es-client2는 데이터, es-client3는 데이터

cluster.name: es-demo
node.name: node-1   (각각node-2, node-3으로 설정)
node.master: true      (마스터 노드만 true로 설정, 데이터 노드는 false)
node.data: false         (마스터 노드만 false로 설정, 데이터 노드는 true)

기동 장애 발생 시 대응..

rm -rf /var/lib/elasticsearch/nodes/0
로 데이터 삭제 후, 재설정

실행 결과

es-client1, es-client2, es-client3에 각각 분산되어 데이터 수집

보나스 테스트(Metricbeat로 apache,system 모니터링)

[root@localhost modules.d]# metricbeat modules list
Enabled:
apache
system

vi apache.yml

# Module: apache
# Docs: https://www.elastic.co/guide/en/beats/metricbeat/6.4/metricbeat-module-apache.html

– module: apache
#metricsets:
metricsets: [“status”]
# – status
period: 10s
hosts: [“http://127.0.0.1”]
server_status_path: “server-status”
#username: “user”
#password: “secret”

vi system.yml

# Module: system
# Docs: https://www.elastic.co/guide/en/beats/metricbeat/6.4/metricbeat-module-system.html

– module: system
period: 10s
metricsets:
– cpu
– load
– memory
– network
– process
– process_summary
– core
– diskio
– socket
process.include_top_n:
by_cpu: 5 # include top 5 processes by CPU
by_memory: 5 # include top 5 processes by memory

– module: system
period: 1m
metricsets:
– filesystem
– fsstat
processors:
– drop_event.when.regexp:
system.filesystem.mount_point: ‘^/(sys|cgroup|proc|dev|etc|host|lib)($|/)’

– module: system
period: 15m
metricsets:
– uptime

실행 결과

es-client1, es-client2, es-client3에 각각 분산된 system, apache 데이터 결과

ELK설치 8편 (Heartbeat Monitoring)

동작 시간 모니터링으로
활성 상태를 탐지하고 서비스가 가능한지 모니터링합니다

Heartbeat 설치

Heartbeat 다운로드 및 설치

설치파일 다운로드

https://artifacts.elastic.co/downloads/beats/heartbeat/heartbeat-6.4.2-x86_64.rpm

설치

# yum install heartbeat-6.4.2-x86_64.rpm

환경설정

# heartbeat setup –template -E output.logstash.enabled=false -E ‘output.elasticsearch.hosts=[“192.168.0.113:9200”]’

키바나 대시보드 템플릿 추가

# heartbeat setup –dashboards Loading dashboards (Kibana must be running and reachable) Loaded dashboards

대시보드 kibana 접속설정 및 데이터 수집 elasticsearch 경로 설정

http, icmp 형태로 서버의 서비스 유무를 확인

Heartbeat 실행

# /usr/share/heartbeat/bin/heartbeat -e -c ./heartbeat.yml -d “publish”

Heartbeat 모니터링 대시보드

ELK설치 7편 (Winlogbeat로 Windows모니터링)

Windows 기반 인프라의 상태를 확인하기 위해 Winlogbeat를 설치하고 Windows 이벤트 로그를 수집합니다

Winlogbeat 설치

설치파일 다운로드 

https://artifacts.elastic.co/downloads/beats/winlogbeat/winlogbeat-6.4.2-windows-x86_64.zip

Powershell로 설치

.\install-service-winlogbeat.ps1

대시보드 템플릿 템플릿 셋업

 .\winlogbeat.exe setup –dashboards

Winlogbeat 환경설정

대시보드 kibana 접속설정 및 데이터 수집 elasticsearch 경로 설정

Winlogbeat 모니터링 대시보드

ELK설치 6편 (Metricbeat)

Metricbeat은 다양한 시스템 및 서비스 메트릭을 수집하여 지정된 출력 대상에 제공하는 경량 log수집기입니다.

Metricbeat은 사용자 환경의 다른 서버에 설치되며 성능 모니터링뿐만 아니라 서버에서 실행중인 다른 외부 서비스의 성능 모니터링에도 사용됩니다. 예를 들어, Metricbeat을 사용하여 시스템 CPU, 메모리 등을 모니터링하고 분석 할 수 있습니다. 

서버스펙

운영 서버에 필요한 CPU, RAM, 저장장치
  – OS : Centos 7
  – CPU : 4core
  – RAM : 4GB
  – JAVA : Openjdk 8

Metricbeat 설치

curl -L -O https://artifacts.elastic.co/downloads/beats/metricbeat/metricbeat-6.4.2-x86_64.rpm

rpm -vi metricbeat-6.4.2-x86_64.rpm

# vi /etc/metricbeat/metricbeat.yml

kibana 대시보드, 수집된 데이터를 elasticsearch로 보내기 위한 설정

시스템 모듈 활성화

metricbeat modules enable system

Metricbeat 실행

#metricbeat setup

#metricbeat -e -c /etc/metricbeat/metricbeat.yml

Windows, Centos 복수대의 서버에 Metricbeat를 실행한 결과

ELK설치 5편 (Application Performance Monitoring)

안정적인 서비스 운영을 위해 꼭 필요한 APM(Application Performance Management)을 구성하여 현재 시스템의 어느 곳이 성능 병목 구간인지, 어떤 에러가 발생하는지 추적해보겠습니다.

APM 설치

APM서버 다운로드 및 설치

환경설정

vi /etc/apm-server/apm-server.yml

APM서버 실행

/usr/share/apm-server/bin/apm-server -c /etc/apm-server/apm-server.yml

APM Agent 다운로드

https://search.maven.org/search?q=a:elastic-apm-agent

https://search.maven.org/remotecontent?filepath=co/elastic/apm/elastic-apm-agent/0.7.0/elastic-apm-agent-0.7.0.jar

APM Agent 실행

java -javaagent:/home/min/elastic-apm-agent-0.7.0.jar -Delastic.apm.service_name=my-application -Delastic.apm.server_url=http://localhost:8200 -Delastic.apm.application_packages=org.example -jar my-application.jar

또는
 # vi /home/min/apache-tomcat-7.0.91/bin/catalina.sh 에 이하 내용 추가

APM Agent 서비스 실행 실패의 경우

서비스 기동후, Tomcat서버에서 ELK서버로의 connect 실패의 경우

ELK서버에서 # vi /etc/elasticsearch/elasticsearch.yml 

network.host: 0.0.0.0

변경 후, elasticsearch 재기동하면 접속 성공

ELK설치 4편 (Tomcat log Visualization)

CENTOS 7에서 ELK(ELASTICSEARCH, LOGSTASH, KIBANA, Beats)를 구축하고 TOMCAT서버 를 실시간 모니터링 하는 방법을 설명합니다.

Tomcat서버에서 수집된 로그를 kibana에서 모니터링 합니다.

수집된 데이터의 시각화

menu Visualize 선택 후, [Create a visualization] 클릭
Line, Area and Bar charts, Heat maps, Pie chart, Data table, Maps 등 다양한 차트 중, 파이 차트를 선택합니다.

파이차트에 표시할 데상 데이터 셋을 선택

Y축에 대한 메트릭 집계(Sum, Count 등)을 선택하고 실행 버튼을 클릭하면 원하는 데이터가 표시됨

ELK설치 3편 (Tomcat log monitoring with Kibana)

ELK설치 및 모니터링 테스트 3편

CENTOS 7에서 ELK(ELASTICSEARCH, LOGSTASH, KIBANA, Beats)를 구축하고 TOMCAT서버 를 실시간 모니터링 하는 방법을 설명합니다.

Tomcat서버에서 수집된 로그를 kibana에서 모니터링 합니다.

Kibana 로그인 화면

http://localhost:5601/

Elasticsearch Index 생성


1) Elasticsearch index, 2) Kibana index patterns


1) Elasticsearch Index

Health 상태

RED : 일부 또는 전부가 준비되지 않음.
YELLOW : Elasticsearch가 모든 기본 샤드를 할당했지만 복제본의 일부 또는 전부가 할당되지 않음
GREEN : 클러스터가 완전히 작동중.Elasticsearch는 클러스터 내의 시스템에 모든 샤드 및 복제본을 할당 할 수 있음

2) Kibana Index Patterns

Elasticsearch 색인의 데이터 시각화
index pattern 선택
filebeat로 수집된 데이터의 메터 정보 확인

Discovery menu에서 수집된 데이터 확인

수집된 데이터가 5초 간격으로 표시

Discover 페이지에서 대화식으로 데이터를 탐색 할 수 있고 선택한 색인 패턴과 일치하는 모든 색인에 대해 액세스 할 수 있습니다. 해당 데이터를 선택 할 경우, 수집된 상세 내용도 확인 가능 합니다.

ELK설치 2편 (Tomcat, Filebeat 설치 및 logstash연결)

ELK설치 및 모니터링 테스트 2편

CENTOS 7에서 ELK(ELASTICSEARCH, LOGSTASH, KIBANA, Beats)를 구축하고 TOMCAT서버 를 실시간 모니터링 하는 방법을 설명합니다.

1편에 이어서 tomcat서버에 beats를 설치하고 elasticsearch 와 kibana연동을 목표로 합니다.

BEATS 설치

filebeat 다운로드
# wget https://artifacts.elastic.co/downloads/beats/filebeat/filebeat-6.4.2-x86_64.rpm

filebeat 설치
# yum install filebeat-6.4.2-x86_64.rpm

filebeat 환경설정filebeat 다운로드
# wget https://artifacts.elastic.co/downloads/beats/filebeat/filebeat-6.4.2-x86_64.rpm

filebeat 설치
# yum install filebeat-6.4.2-x86_64.rpm

 filebeat 환경설정

# vi /etc/filebeat/filebeat.yml

filebeat.prospectors:

– input_type: log
paths:
– /home/min/apache-tomcat-7.0.91/logs/*.txt

output.logstash:
hosts: [“192.168.0.113:5044”]

filebeat 실행

 # /usr/share/filebeat/bin/filebeat -e -c /etc/filebeat/filebeat.yml -d “publish”

ELK서버에서 logstash 실행

# /usr/share/logstash/bin/logstash -f /etc/logstash/tomcat.conf

ELK서버에서 tomcat서버의 로그 수집을 위한 환경 설정

/usr/share/logstash/bin/logstash -f /etc/logstash/tomcat.conf

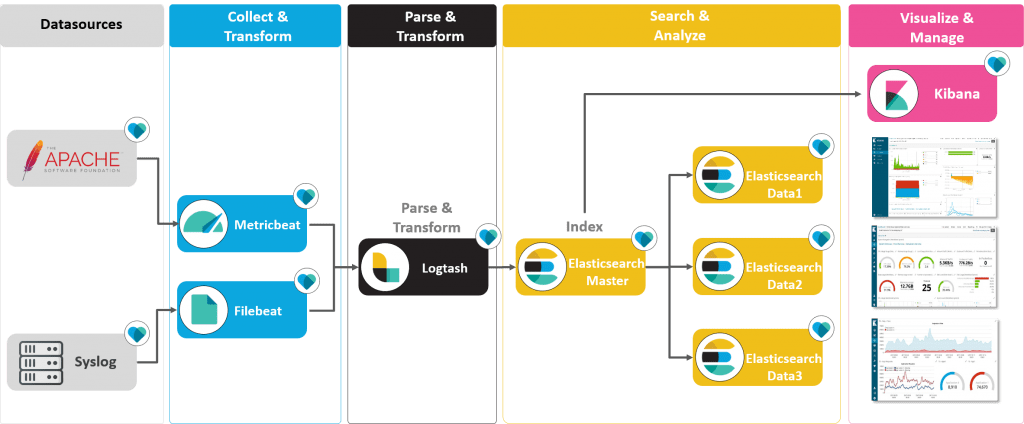
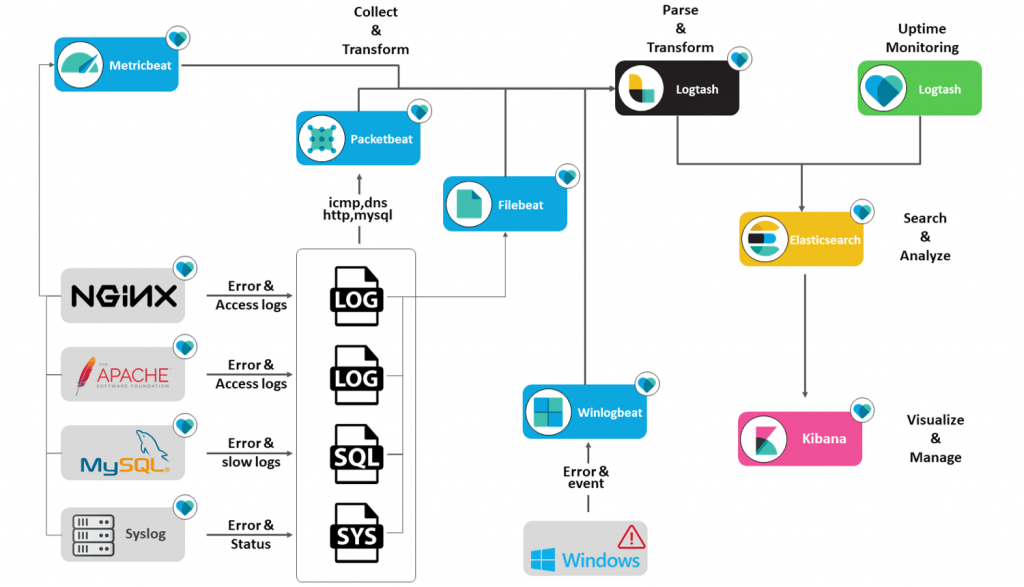
# [Beats input plugin]
# listen on port 5044 for incoming Beats connections
input {
beats {
port => 5044
}
}

# The filter part of this file is commented out to indicate that it is
# optional.

filter {
grok {
match => [ “message” , “%{IPV4:clientIP} – %{NOTSPACE:user} \[%{DATA:timestamp}\] \”%{WORD:method} %{NOTSPACE:request} HTTP/1.1\” %{NUMBER:status} %{NUMBER:bytesSent}” ]
}
geoip {
source => “clientip”
}
}

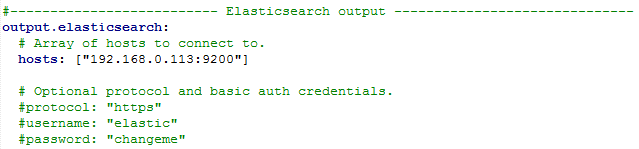
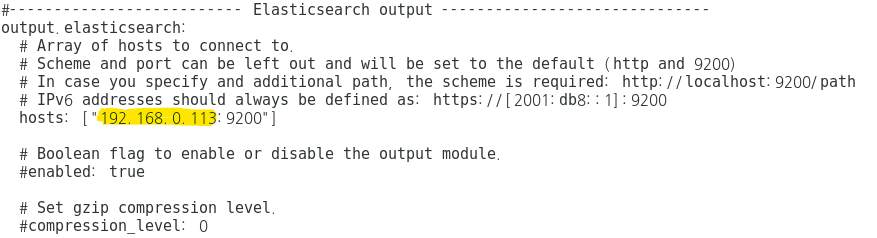
# [Elasticsearch output plugin]
# index into Elasticsearch
output {
elasticsearch {
hosts => “localhost:9200”
manage_template => false
index => “%{[@metadata][beat]}-%{[@metadata][version]}-%{+YYYY.MM.dd}”
}
}

ELK설치 1편 (Elasticsearch,Logstash,Kibana) 설치

ELK설치 및 모니터링 테스트 1편

CENTOS 7에서 ELK(ELASTICSEARCH, LOGSTASH, KIBANA)를 구축하고 TOMCAT서버 를 실시간 모니터링 하는 방법을 설명합니다.

  • Beats 6.4.2 : 가벼운 데이터 수집기. 로그, 메트릭, 네트워크, 이벤트, 감사데이터, 가동시간 모니터링 등을 실시간 수집
  • Logstash 6.4.2 : 데이터 집계, 변환, 저장. 다양한 소스에서 동시에 데이터를 수집하여 변환한 후 분석, 변환하여 저장소(elasticsearch)에 전달
  • Elasticsearch 6.4.2 : 분산형 RESTful 검색 및 분석 엔진. 정형, 비정형 데이터, 위치정보, 메트릭등 다양한 데이터를 원하는 방식으로 검색하고 저장
  • Kibana 6.4.2 : 로그 검색, 관계 분석 등을 위한 인터랙티브 시각화 도구

목표 시스템 구성도.

서버스펙

운영 서버에 필요한 CPU, RAM, 저장장치
  – OS : Centos 7
  – CPU : 4core
  – RAM : 4GB
  – JAVA : Openjdk 8

Elasticsearch 설치

Elasticsearch 다운로드
# wget https://artifacts.elastic.co/downloads/elasticsearch/elasticsearch-6.4.2.rpm

Elasticsearch 설치
# yum install elasticsearch-6.4.2.rpm

kibana설치

kibana 다운로드
# wget https://artifacts.elastic.co/downloads/kibana/kibana-6.4.2-x86_64.rpm

kibana 설치
# yum install kibana-6.4.2-x86_64.rpm

Logstash 설치

logstash 다운로드
# wget https://artifacts.elastic.co/downloads/logstash/logstash-6.4.2.rpm

logstash 설치
# yum install logstash-6.4.2.rpm

kibana & elasticsearch & logstash 기동

[root@localhost min]# systemctl start elasticsearch


[root@localhost min]# systemctl start kibana

[root@localhost min]# systemctl start logstash

설치 관련 로그 위치

[root@localhost elasticsearch]# pwd
/var/log/elasticsearch
[root@localhost elasticsearch]# ls -al
합계 144
drwxr-x—. 2 elasticsearch elasticsearch 218 10월 11 00:56 .
drwxr-xr-x. 20 root root 4096 10월 11 00:15 ..
-rw-r–r–. 1 elasticsearch elasticsearch 8068 10월 11 00:56 elasticsearch.log
-rw-r–r–. 1 elasticsearch elasticsearch 0 10월 11 00:56 elasticsearch_access.log
-rw-r–r–. 1 elasticsearch elasticsearch 263 10월 11 00:56 elasticsearch_deprecation.log
-rw-r–r–. 1 elasticsearch elasticsearch 0 10월 11 00:56 elasticsearch_index_indexing_slowlog.log
-rw-r–r–. 1 elasticsearch elasticsearch 0 10월 11 00:56 elasticsearch_index_search_slowlog.log
-rw-r–r–. 1 elasticsearch elasticsearch 66276 10월 11 01:10 gc.log.0.current